

Freestyle Chess (also known as Fischer-Random, Chess960, or Chess9LX), is the variant in which pieces on the back row are shuffled in one of 960 configurations at the start of the game. Until now, it has been regarded as a novelty. Standard chess offers a great starting position, in that there are countless ways to develop harmony between the pieces. But elite players have studied this phase in depth, and it is rare that they face any truly novel problems in the opening phase.
Freestyle Chess is arguably a more stringent test of skill than the standard game, because players cannot rely on their memory. Even for elite players, the first few moves require deep thought, and it is fascinating to watch them striving to coordinate their jumbled pieces.
The first event in the Freestyle Chess Grand Slam series, held at the Weissenhaus luxury resort near Hamburg, had a surprise winner in the young German grandmaster Vincent Keymer, who defeated Carlsen in the semifinal (see below) and Caruana in the final.
The game below had as its start position: Na1, Bb1, Rc1, Kd1, Be1, Rf1, Qg1, Nh1. Black’s setup mirrors that: Na8, Bb8, Rc8, etc.
Vincent Keymer-Magnus Carlsen
Freestyle Chess Grand Slam, Weissenhaus, 2025
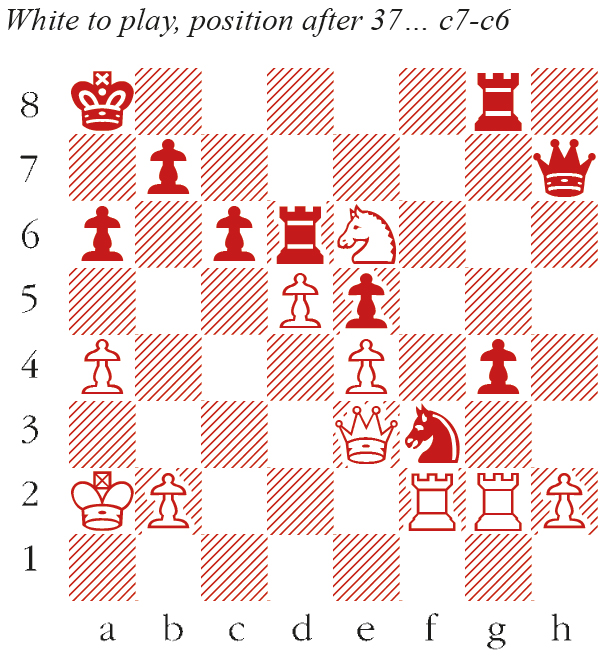
1 g4 Ng6 2 Nb3 e5 3 Ng3 The cheeky 3 Nc5 (or 3 Na5) already comes into consideration, but Black could respond by castling queenside (!) – see the note to the fourth move. f6 4 c4 O-O-O Freestyle castling rules are peculiar. Here, the Black king moves from d8 to c8 and the rook moves from c8 to d8, i.e. they simply swap places. 5 d4 Nb6 6 d5 d6 7 Bf5+ Bd7 8 f3 a6 9 e4 Nf4 10 Bxd7+ Rxd7 11 Kc2 If Keymer had castled queenside, swapping the places of the king and rook just as Carlsen did on move 4, 11…Nxc4 was a good response. 11…Ba7 Carlsen probably refrained from 11…Nxc4 on the grounds that 12 Kb1 Nb6 13 Qxb6 uses the c-file pin to win the knight. But in fact 12 Kb1 could be met by Nh3!, with a possible repetition after 13 Qg2 Nf4 14 Qg1 etc. 12 Bd2 Kb8 13 Be3 Nh3 14 Qg2 Nf4 15 Qf2 h5 16 Rfd1 hxg4 17 fxg4 Nc8 18 c5 dxc5 19 Bxc5 g6 20 Bxa7+ Nxa7 21 Kb1 At last, Keymer has achieved a harmonious position, and looks toward the queenside to develop his initiative. Qh7 22 Nc5 Rd6 23 Ne2 Nxe2 24 Qxe2 Nb5 25 Qc4 Rc8 26 a4 Nd4 27 g5! The point is that 27…fxg5 meets a strong response in 28 Rxd4! exd4 29 e5 when the pawn duo confers a powerful initiative, e.g. 29…Rb6 30 d6! cxd6 31 Nxa6+ Rxa6 32 Qxc8+ Ka7 33 Rc7! and wins. 27…Rcd8 28 gxf6 Rxf6 29 Rf1 Rb6 30 Rf2 g5 31 Ka2 Ka7 32 Rcf1 g4 33 Qc3? A missed opportunity. 33 Rf7 suggests itself, but 33…Qxh2 threatens mate on b2, and the initial impression is that White has no follow-up after 34 R1f2 Qh4. But 35 Rxc7! is strong, when 35…Qxf2 gives rise to the position in this week’s puzzle. Nf3 34 Rg2 Rg8 35 Rff2 Rd6 36 Qe3 Ka8 37 Ne6 c6? (see diagram) Carlsen’s attempt to undermine the powerful knight on e6 backfires. 38 Qa3! Keen tactics from Keymer. Strangely, there is no reasonable way to defend the rook; 38…Qe7 39 Rxf3 wins due to the pin on the g-file, while 38…Rd7 39 Nf8! forks queen and rook. 38…Qxe4 doesn’t help either, as after 39 Qxd6 Qxa4+ 40 Qa3 the checks soon run out. Rxe6 39 dxe6 Rc8 Black resigns as 40 Rxg4 Nd4 41 Rf8 wins easily.


Comments