It’s difficult for non-players to imagine the extent to which bridge hands can torment us. I’ve spent hours this week mulling over a fiendishly complicated slam, endlessly jotting down diagrams on bits of paper and snapping at my children whenever they interrupted my train of thought. I described it last time — it was played by Fulvio Fantoni and won Declarer Play of the Year. When I showed it to the manager of TGRs, Artur Malinowski, he spotted a superior line. See what you think:
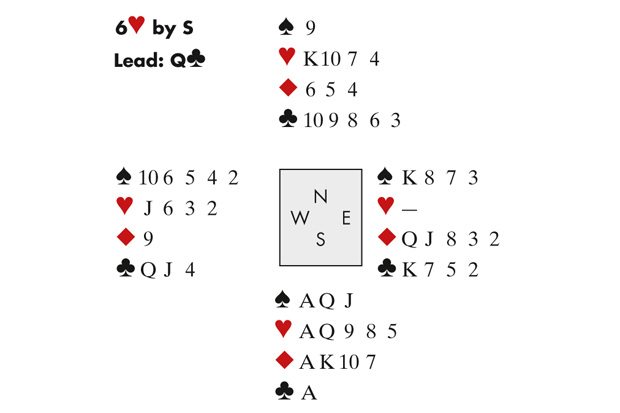
East had passed and then made a take-out double (vul), strongly suggesting a void in hearts. Fantoni won the ♣ lead and played a low heart to dummy’s ♥7. He then ran the ♣10, discarding a diamond. West won and played a heart to dummy’s ♥10. Now came the ♣9, covered by the ♣K and ruffed with the ♥Q. The rest was easy: ace of hearts, heart to the king, two winning clubs and a spade finesse. The drawback of Fantoni’s line is that it requires West to hold three clubs — with only 2, if East doesn’t cover the ♣9, declarer must ruff high and West eventually makes his ♥J.
Malinowski’s line succeeds when West has three or two clubs. Remember, if West has two clubs, he must have at least two diamonds, otherwise he’d have six spades: impossible, given East’s take-out double. Here’s Malinowski’s solution: at trick 2, play the ♠J from hand! East’s best return is probably a diamond. Declarer wins and discards two diamonds on the ♠AQ. Next comes the ♦K. If West follows (or discards), declarer discards a club, then plays a trump to the ♥7, ruffs a club, ruffs a diamond, ruffs a club high, ruffs a diamond, ruffs a club high, and is left with a top trump in dummy.
If West ruffs the ♦K, declarer over-ruffs, ruffs a club to hand, plays a trump to dummy, ruffs a club low, ruffs a diamond, ruffs a club high, ruffs a diamond high and ruffs his last club high (poor West is forced to under-ruff twice).
Good luck trying to grasp it all. I for one never want to think about this hand again!


Comments