
When life moved to Zoom in March 2020, I quickly found myself with a lot of time on my hands. With events and weddings off the cards indefinitely, I needed to pivot my baking business and realised that if people couldn’t go out to eat cake, I needed to get the cake to them. Overnight, boxes and packing tape were ordered, recipes chosen, and my postal bakes business was formed.
Thanks to the power of Instagram, demand was overwhelming. People ordered boxes for their households – their arrival a mini event to look forward to amid the monotony of lockdown – but most ordered for others. Boxes were being sent to say everything that I was feeling, too – I love you, I miss you, I’m here for you, we will be together again.
Thankfully, lockdown is now over for most of us, but there are still so many times in life where work, study, relationships, travel, illness or simply busy diaries separate us from those that we love. Posting baked goods is easier than you might think, and it’s a thoughtful (not to mention economical) way of lifting the spirits of someone you care about.
Here are some of my recipes for simple homemade gifts. Gooey salted caramel brownies are sure to delight or, for coffee lovers, a slice of white chocolate and ginger biscuit cake is perfect for enjoying alongside a late morning cup. If you’re looking for something super simple, my grown-up chocolate buttons are a winner, and perfect for using up bits and pieces lurking at the back of the baking cupboard.
I hope I can inspire you to bake and send treats to the loved ones that you can’t see as often as you would like. I think it might surprise you how much it means to them.
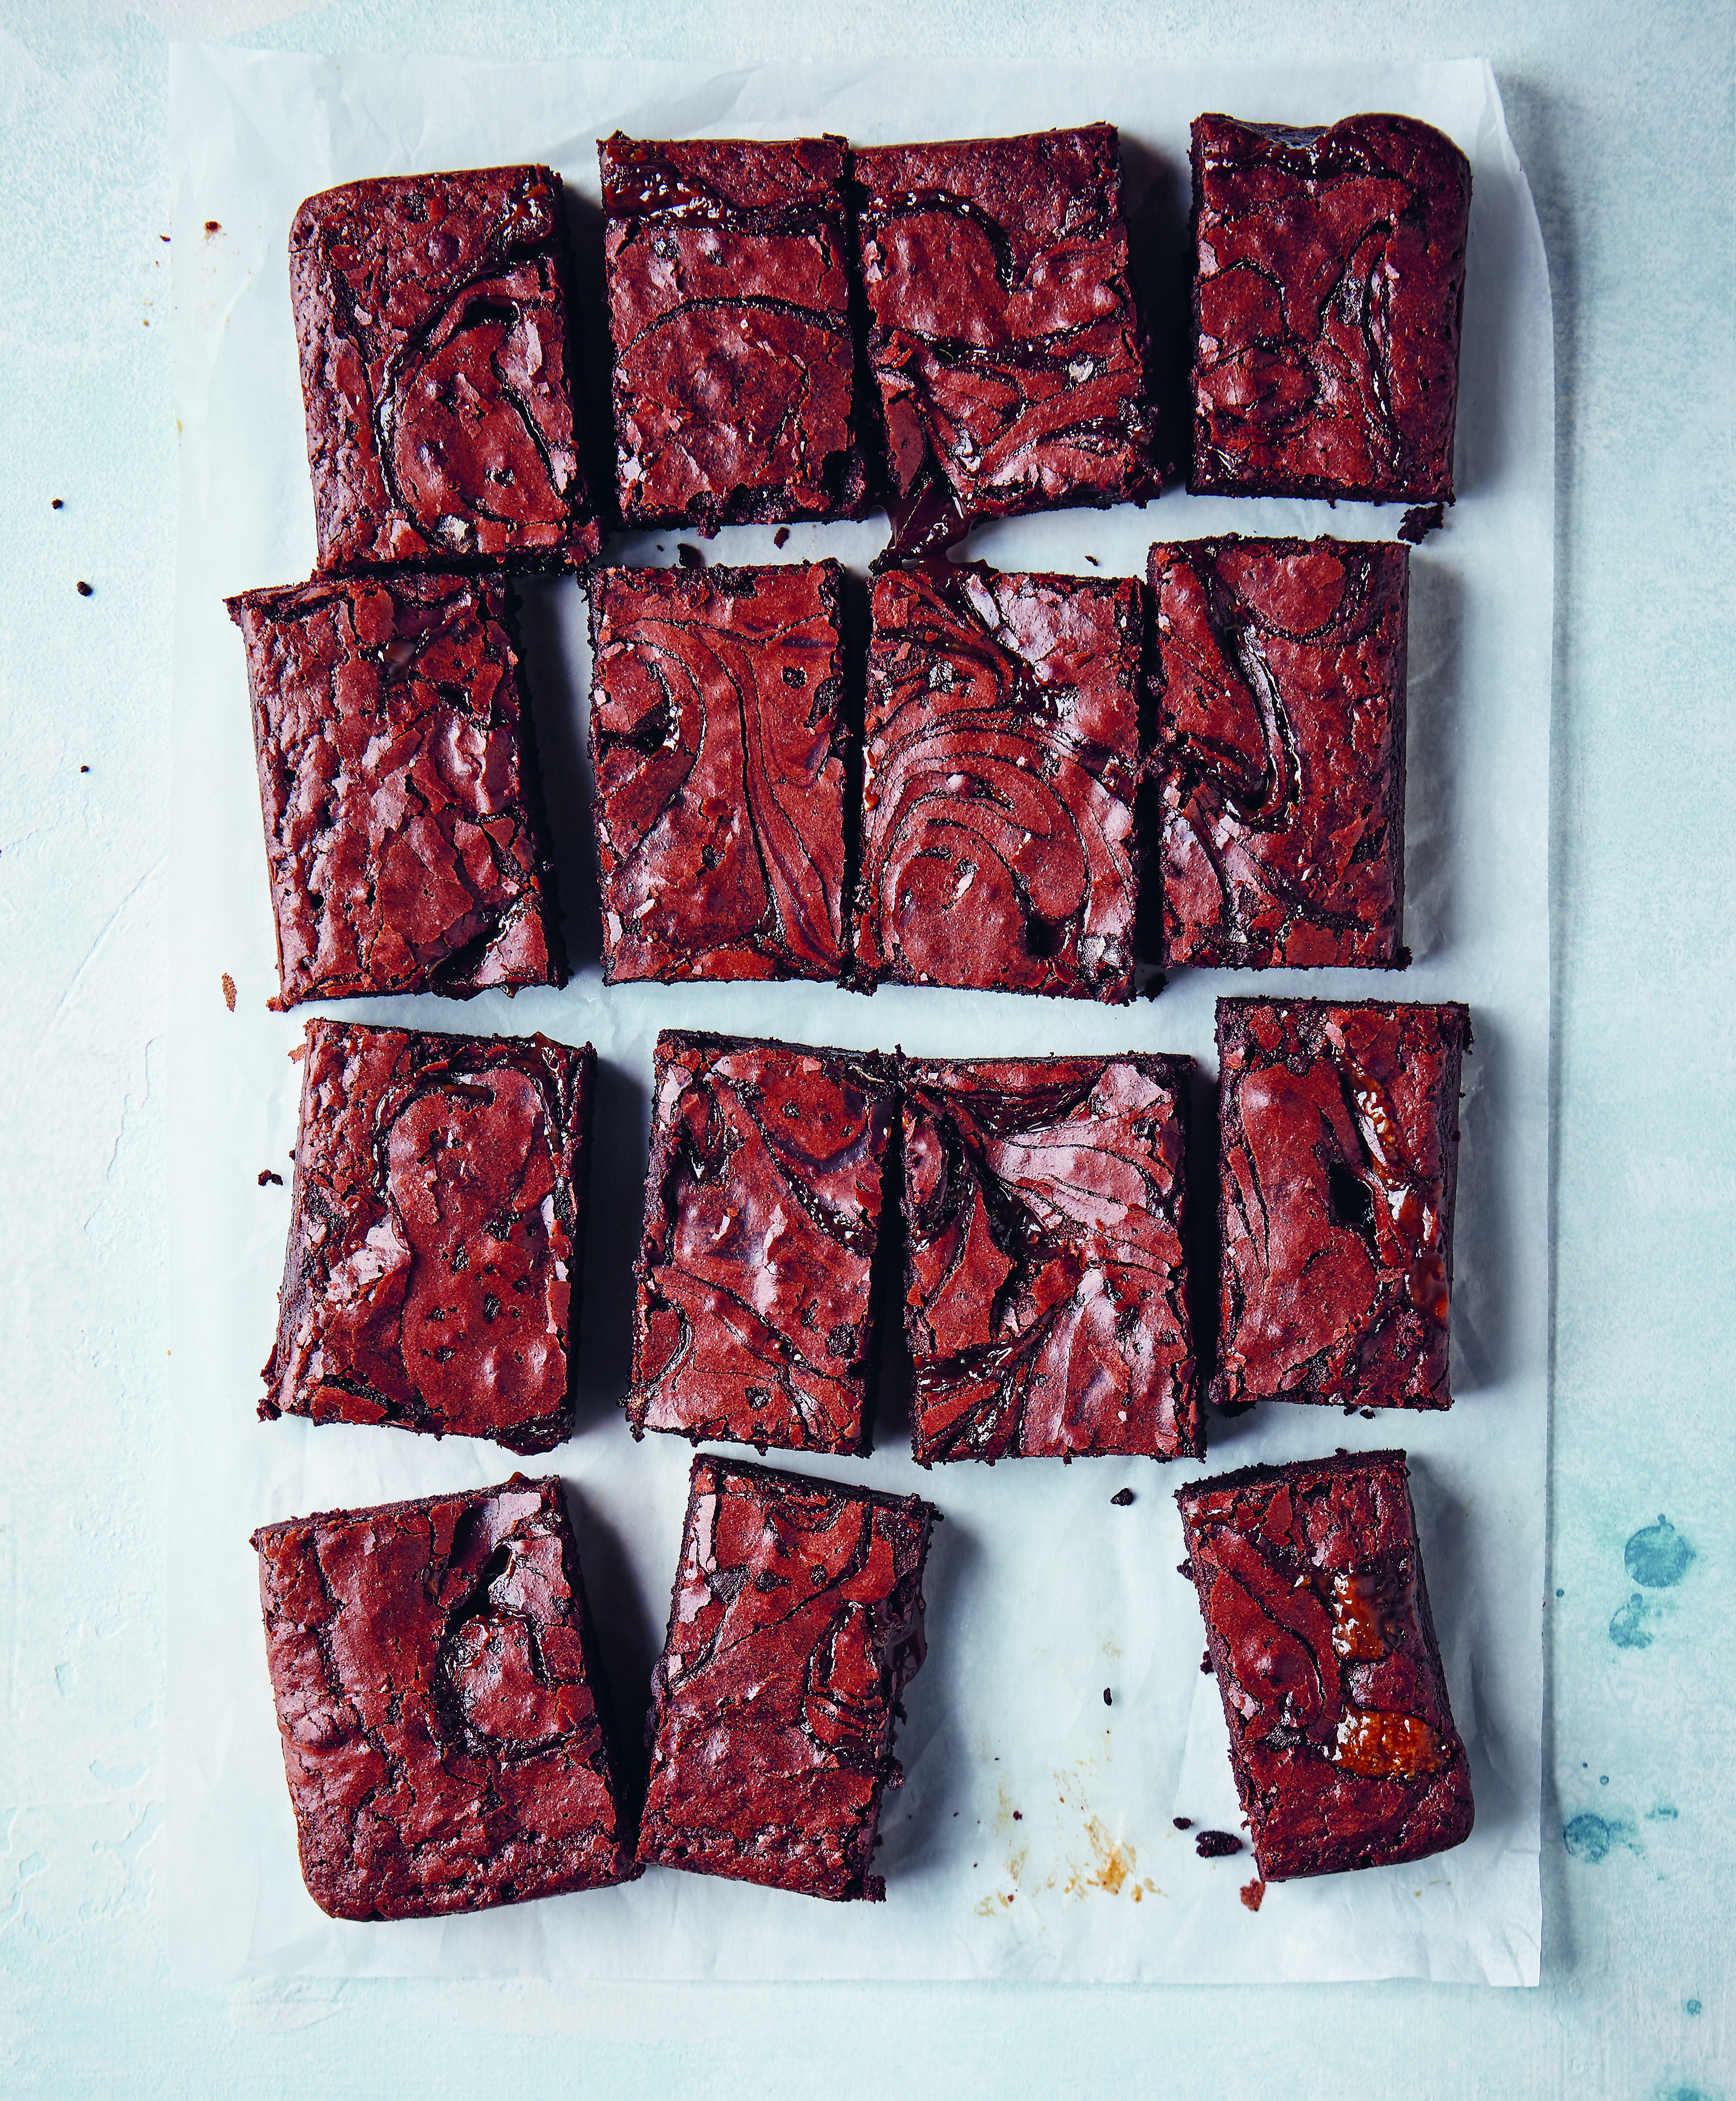
Salted caramel brownies
Takes: 15 minutes, plus chilling and making the salted caramel
Bakes: 30–40 minutes
Makes: 16 bars or 24 smaller squares
Sending box after box of brownies through the post was the inspiration for this book, and my quest to develop the perfect recipe has been a long one. I have tried countless ratios of butter, sugar and flour; baking temperatures (hot and fast, low and slow); and cocoa agents (dark chocolate – if so, what percentage of cocoa – or cocoa powder, or both). Finally, I feel confident that I have one of the best brownie recipes out there. These are densely chocolatey, but also slice beautifully and, thanks to the two sugars used in the recipe, have a perfectly crisp, meringue-like crust.
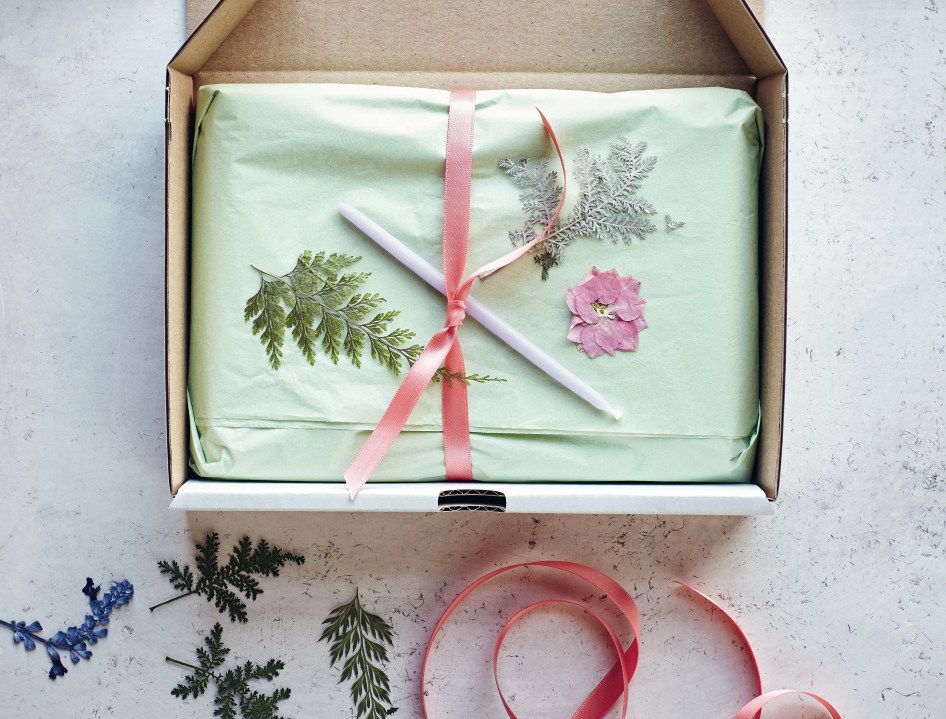
HOW TO POST
All of the brownies in this book will last for at least two weeks when tightly wrapped in airtight packaging. Wrap tightly in cellophane and tissue paper. These can be sent as part of a mixed box (and are robust enough to sit at the bottom) or in a well-fitted box.
Ingredients
FOR THE BROWNIE BATTER:
300 g (10½oz) unsalted butter, cubed
400 g (14 oz/1¾cups) caster (superfine) sugar
100 g (3½oz/generous ½cup) light brown soft sugar
70 g (2½oz/generous ½cup) cocoa (unsweetened chocolate) powder
70 g (2½oz) dark chocolate (minimum 70% cocoa solids) chopped into small pieces
4 eggs
140 g (5 oz/generous 1 cup) plain (all-purpose) flour
½tsp fine sea salt
FOR THE TOPPING:
100 g (3½oz) salted caramel (this can be bought in jars or see my cookbook for how to make your own
Flaky sea salt, for sprinkling
1. Preheat the oven to 180°C (350°F/gas mark 6) and line a 20 x 30 cm (8x 12 inch) tin.
2. To make the brownie batter, put the butter in a large saucepan followed by the caster sugar, brown sugar, cocoa powder and dark chocolate (it is important to put the ingredients in the pan in this order, so that the butter melts first).
3. Place the pan over a low heat and leave for 5 minutes, without stirring, until the butter has completely melted and enveloped the other ingredients. After 5 minutes, give the mixture a stir with a whisk to bring everything together.
4. Once the butter and chocolate are fully melted, remove the pan from the heat (don’t worry if the sugar is still slightly granular at this point). Crack the eggs directly into the pan, then quickly whisk the mixture together until it is glossy and all the ingredients are fully incorporated.
5. Add the flour and salt to the pan and whisk again briefly, until just combined. Make sure you get into the corners of the pan with the whisk to catch any pockets of flour which haven’t been mixed through.
6. Pour the mixture into your lined tin, gently tilting the tin to encourage the mixture to fill to the edges in an even layer. To top the brownie, use 2 teaspoons to dollop spoonfuls of the salted caramel evenly over the surface of the brownie mixture, then use a toothpick to ripple the caramel through the batter. Sprinkle the surface of the brownie with a pinch of flaky sea salt.
7. Place the tin in the centre of the oven and bake for 30–40 minutes, until the brownie no longer wobbles when lightly shaken and a skewer inserted into the middle comes out with just a few wet crumbs. Allow the brownie to cool to room temperature in the tin, then place in the fridge for an hour before slicing. (This will help you get clean edges when you slice the brownies.)
8. Once the brownie has cooled, remove from the tin and slice into 16 brownie bars or 24 smaller squares, if you prefer.
White chocolate, ginger and sour cherry biscuit cake
Takes: 20 minutes, plus chilling 5 minutes
Makes: 16 bars or 32 bitesized pieces
How to post
Wrapped in airtight packaging, this will keep well for two weeks. Wrap the slab tightly in cellophane and tissue. This is quite sturdy so can be posted in a well-fitted box.
Ingredients:
For the base:
400 g (14 oz) white chocolate, broken into small pieces
75 g (2 oz) stem ginger syrup (from the jar)
100 g (3 oz) unsalted butter, cubed
1 tsp fine sea salt
250 g (9 oz) ginger biscuits (cookies)
150 g (5 oz) stem ginger,finely chopped
20 g freeze-dried sour cherries
For the topping:
400 g (14 oz) white chocolate, broken into small pieces
Small handful of freeze-dried sour cherries
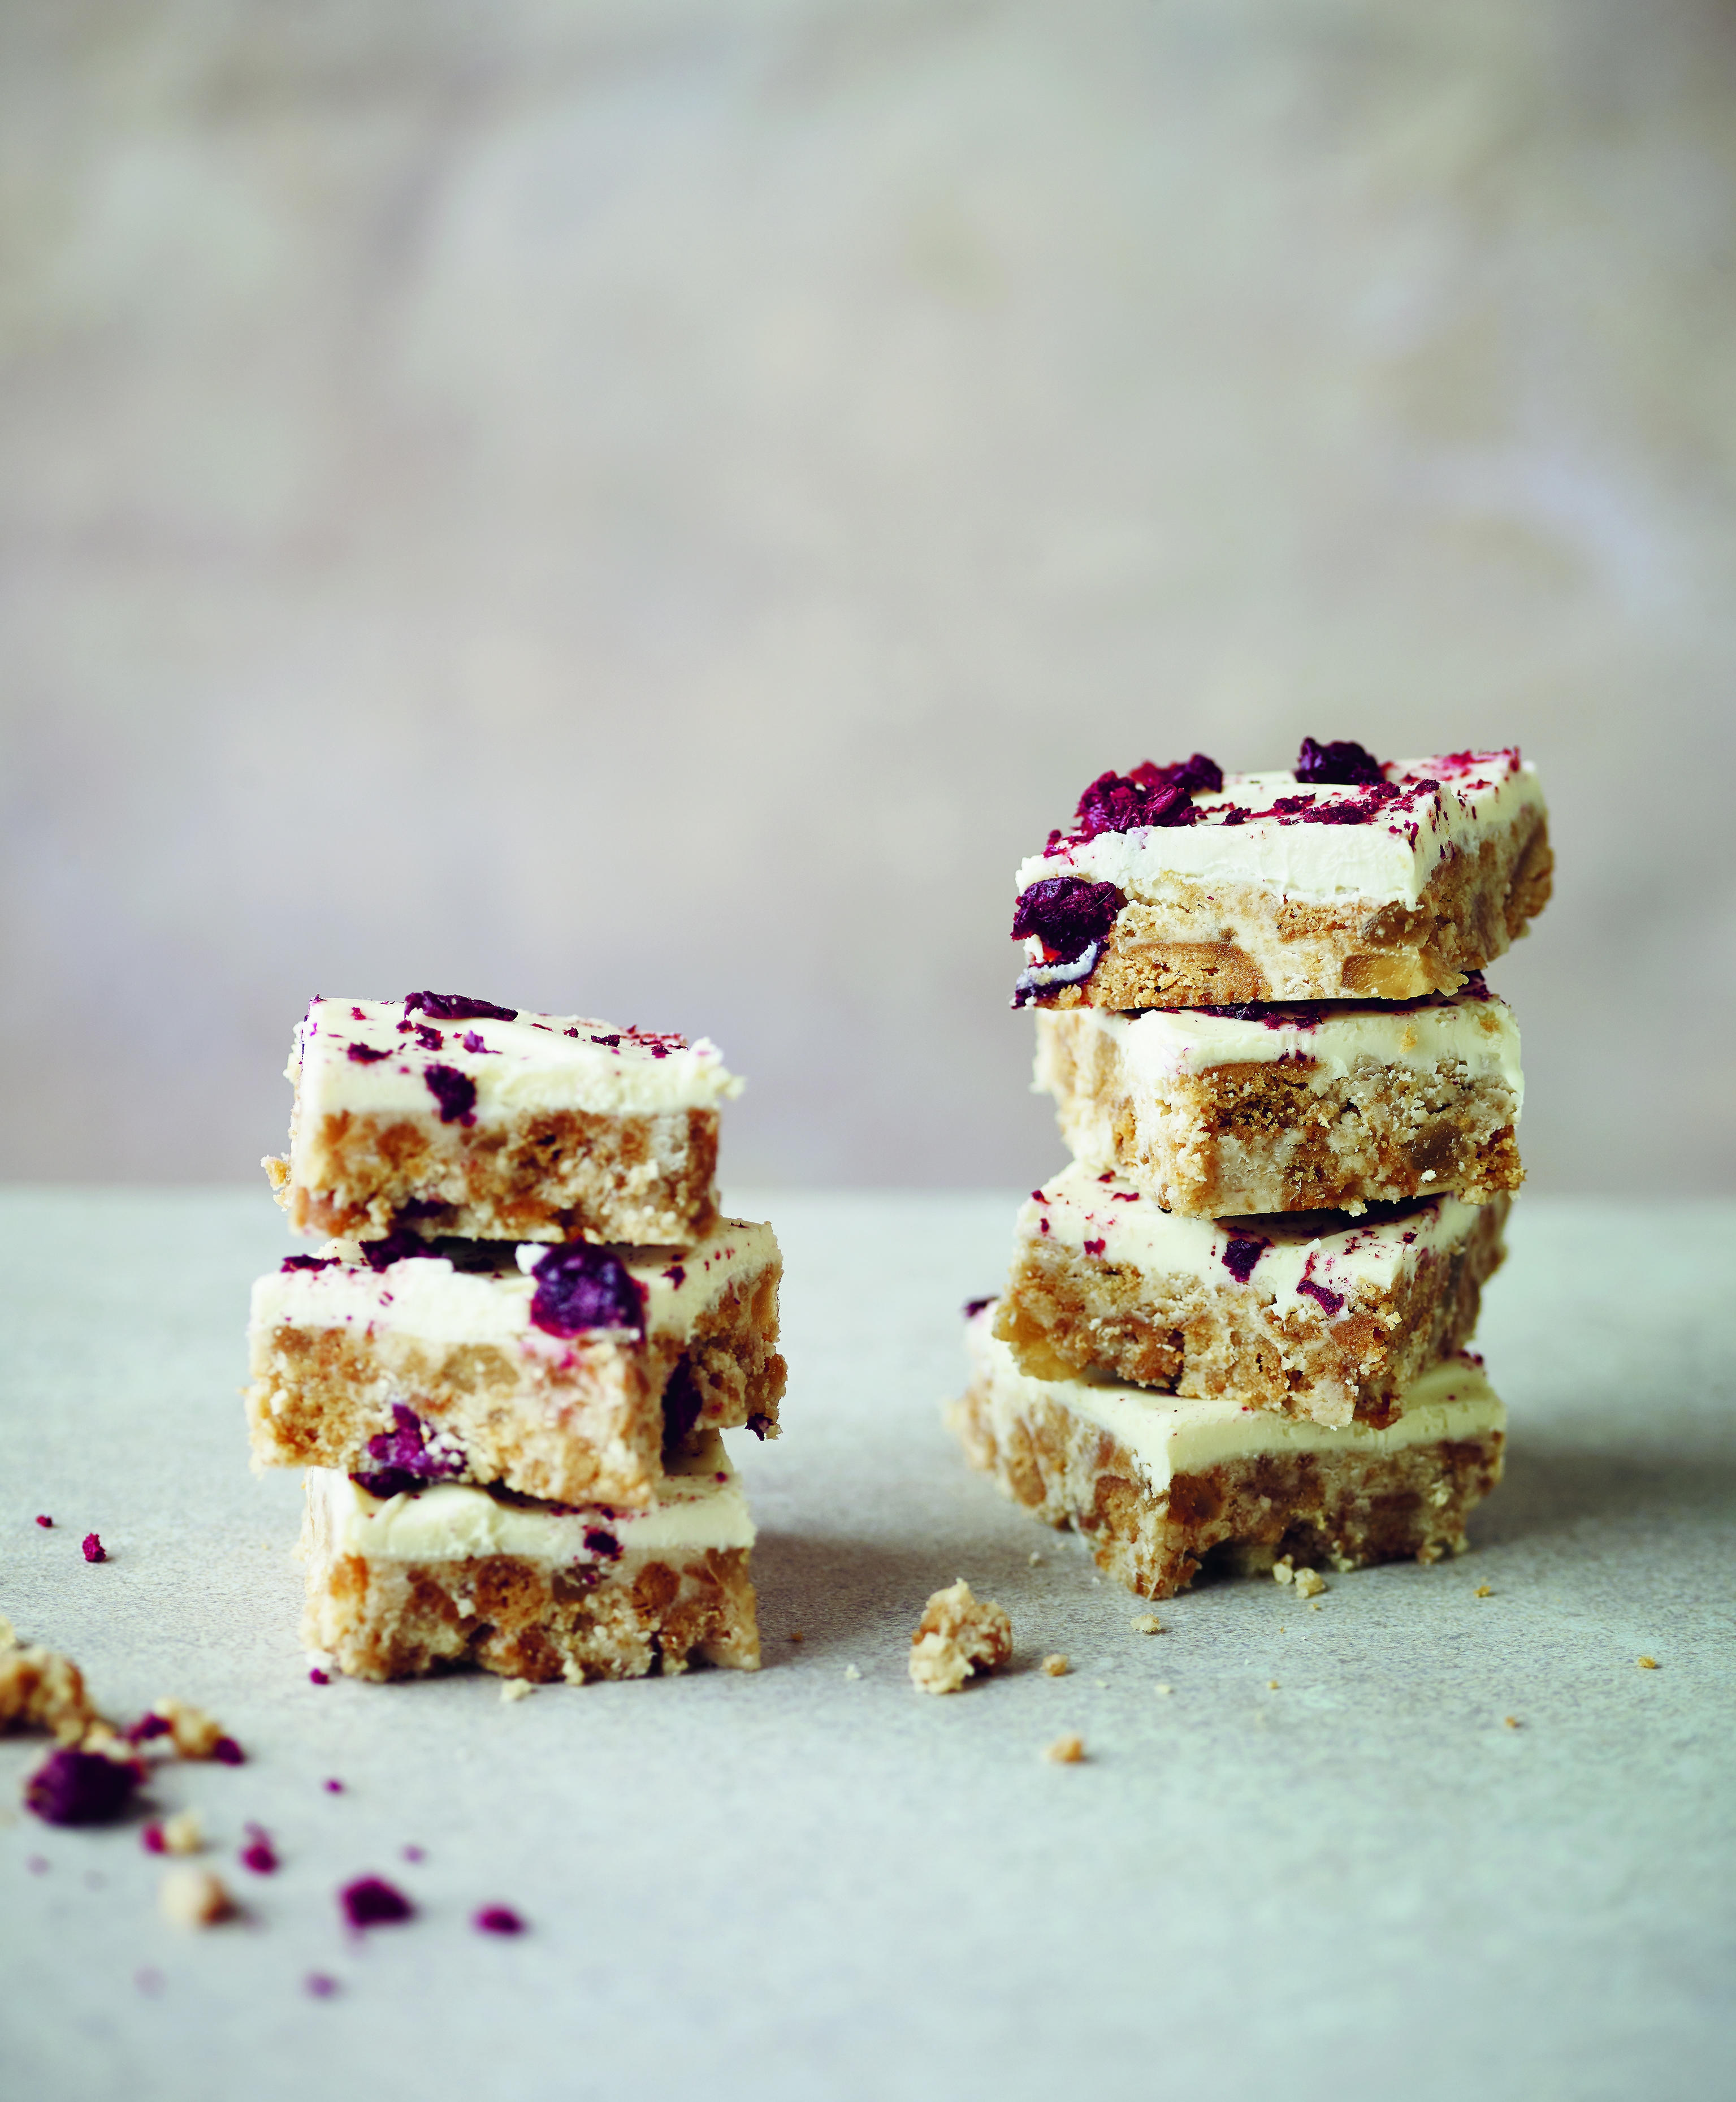
This recipe took a few attempts to get right, but I knew I was finally there when I found myself having to post the results to friends to stop me standing and eating it straight from the fridge. It is very rich thanks to the industrial quantities of white chocolate, so I recommend cutting this into bitesized pieces.
1. Line a 20 x 30 cm (8 x 12 inch) tin.
2. To make the base, bring a pan of water to a gentle simmer, thenremove from the heat and set a snug-fitting heatproof bowl over the top, ensuring that the water in the pan doesn’t touch the base of the bowl.
3. Add the white chocolate, stem ginger syrup, butter and salt to the bowl and heat until melted, stirring occasionally. It is important to keep the pan on the heat as white chocolate catches easily and will go grainy if it gets too hot. If you are struggling to melt it, you can put the pan on a low heat for a few minutes and then remove it again, using just the residual heat of the water to melt everything.
4. Put the ginger biscuits in a large mixing bowl and crush with the end of a rolling pin – I like to leave some chunkier pieces to ensure the biscuit cake has texture. Add the chopped stem ginger to the bowl, then pour in the melted white chocolate mixture and stir well until everything is well coated. Add the freeze-dried cherries and stir again to mix through.
5. Pour the mixture into your prepared tin and level out in an even layer, ensuring the mixture fills right to the corners of the tin.
6. Transfer to the fridge to cool and set for 2–3 hours.
7. When the cake is almost set, melt the white chocolate for the topping in the same way as you did for the cake. Pour the melted chocolate over the cake and use a palette knife to smooth it out in an even layer. Lightly crush the sour cherries for the topping, then scatter them over the top of the cake. Return the cake to the fridge for 30 minutes to allow the chocolate to set, then use a sharp knife to slice the cake into bite-sized pieces.
Grown-up chocolate buttons
Takes: 10 minutes, plus setting
Makes: 40 buttons
How to Post
These will keep well for up to two weeks. Pack the buttons in a small cellophane bag, seal with tape, then wrap gently in tissue paper. If sending in a mixed box, pack these at the top
Ingredients
150 g (5 oz) good-quality dark chocolate (minimum 70% cocoa solids)
1 tsp flaky sea salt
A selection of toppings, such as: pistachio slivers, dried rose petals, chopped stem ginger, dried fruits or sprinkle
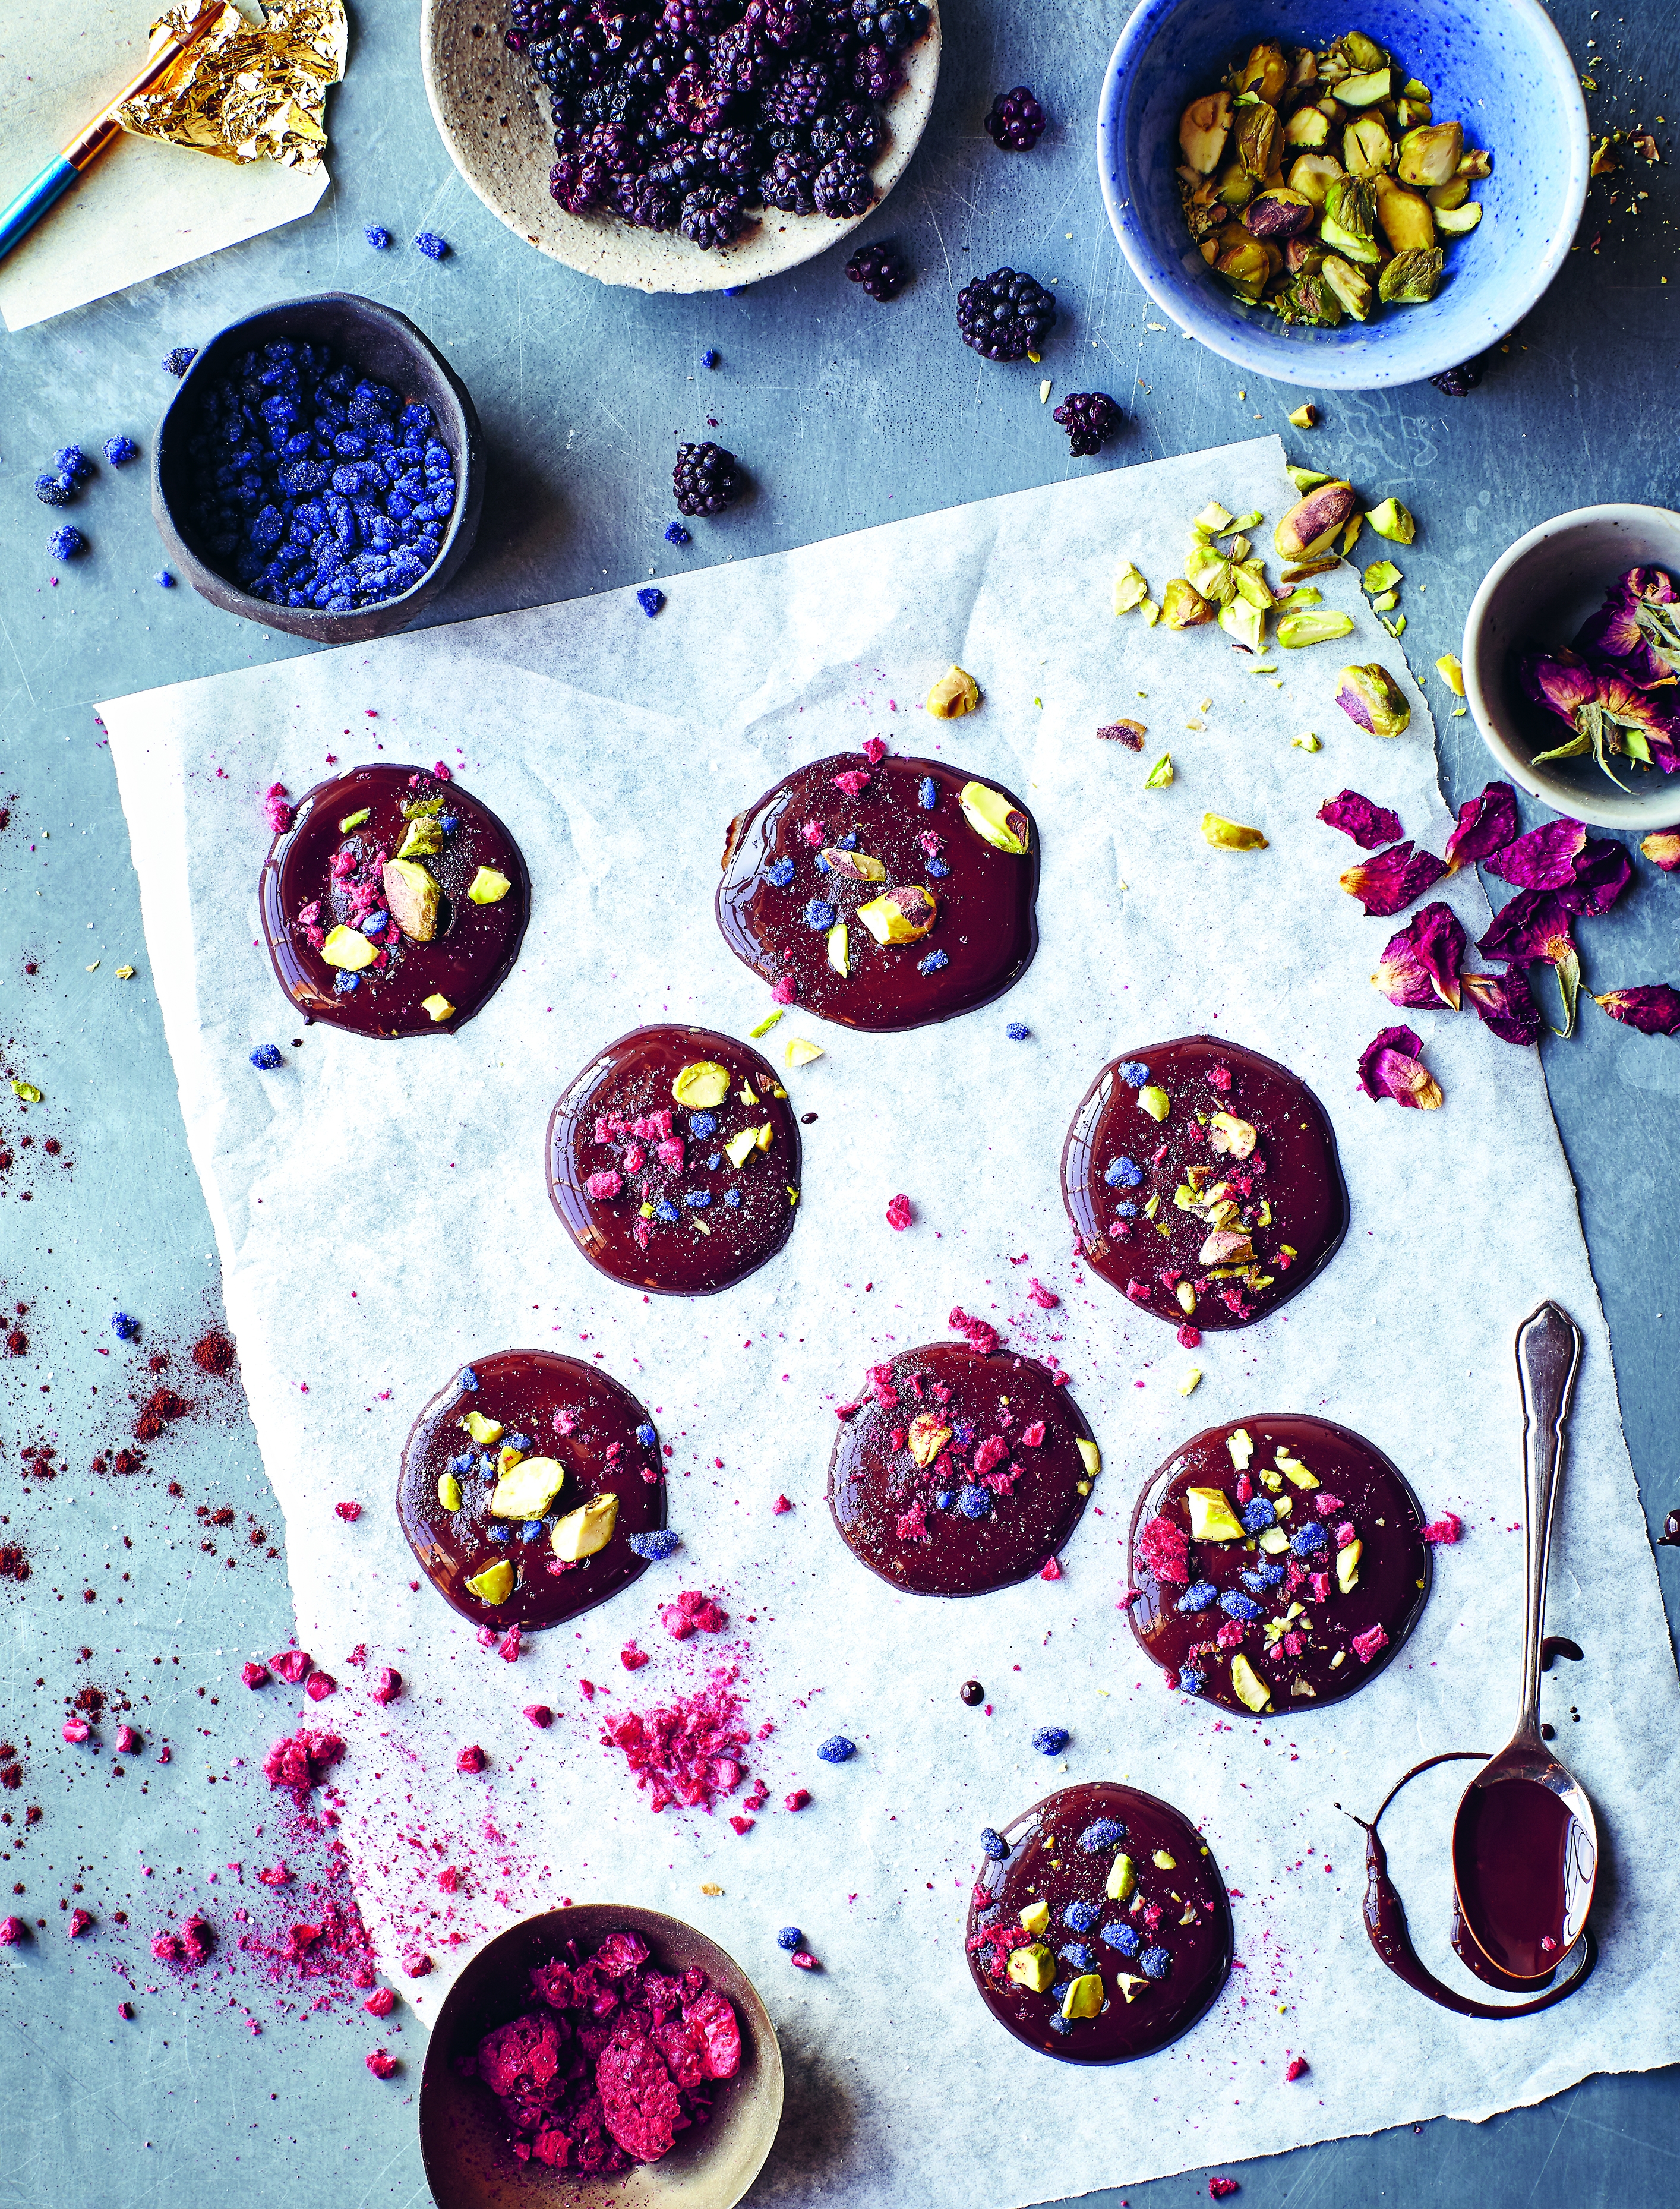
Less of a recipe and more of an idea, these chocolate buttons or Mendiants are an easy gift to make and perfect for using up odds and ends lurking at the back of the baking cupboard. Don’t be tempted to melt the chocolate over a high heat or set these in the fridge, as the rapid change in temperature may cause the chocolate to bloom, which is when little white marks appear on the surface.
1. Line a 20 x 30 cm (8 x 12 inch) tin with baking parchment on the base only.
2. To melt the chocolate, bring a pan of water to a gentle simmer and set a snug-fitting heatproof bowl over the top, ensuring that the water in the pan doesn’t touch the base of the bowl. Add the chocolate to the bowl and heat, without stirring, until about half the chocolate has melted, then remove the bowl from the pan and stir until melted. If not all of the chocolate quite melts, return the bowl to the pan and heat gently for another 5 minutes before removing and stirring again.
3. Pour the chocolate into a piping bag with a small round tip, then pipe small pools of chocolate onto the baking parchment in the tin until you have used up all of the chocolate.
4. Sprinkle the chocolate with a little sea salt, then scatter over your choice of toppings. Leave the buttons to set firm at room temperature.
More recipes can be found in Postal Bakes by Lucy Burton, published by Welbeck Publishing. Postal Bakes is out in the UK on 12 May and in the USA on 14 June.


Comments